Gutters do quiet work. When they fail, they do it loudly, usually with water where it shouldn’t be. Spring is the season to catch small problems before they turn into swollen fascia boards, heaved walkways, or a wet basement. After a winter of freeze-thaw cycles and windblown debris, a careful gutter maintenance routine protects your roof, siding, and foundation. It also sets you up for summer thunderstorms, which often expose the weak links first.
I’ve walked too many properties in late May where the fix would have been a ninety-minute cleaning and a handful of screws in April. The difference between a tidy spring checklist and a hasty fall emergency often comes down to attention to details that don’t make noise until it’s too late. Here is a practical, field-tested guide to assessing, cleaning, and deciding when gutter repair or gutter replacement belongs on your list, along with the smart points to consider if you bring in professional gutter services.
Start with a calm inspection from the ground
Before you pull out a ladder, walk the perimeter. You learn a lot from sightlines and stains. Look for streaks on siding below corners, washed-out mulch, faint trenches in garden beds, and splash marks on foundation walls. These are the places water blows past the system or overflows completely. Scan the roof edge. If you see shingles wicking over the gutter or a sag in the run that catches your eye, mark it mentally. Take a look at your downspout outlets. If grass is matted or soil is eroded two or three feet out, the discharge likely needs redirection.
Spring sunlight is helpful, but overcast days reveal subtler stains and warps. I often carry a pair of compact binoculars to check pitch from a distance. A gutter pitched toward the middle, even by a half inch over 30 feet, will collect standing water. That water breeds mosquitoes once temperatures rise, and it adds weight that pulls fasteners from softened fascia.
If you have trees that drop heavy bloom clusters in spring, like oaks or maples, expect an early-season clog even if leaves aren’t the main issue. Pine needles can bridge across outlets, forming a surprisingly tough mat. Knowing your local debris is half the battle; it informs how often you need simple upkeep versus more involved gutter repair.
Safety comes first and speeds you up
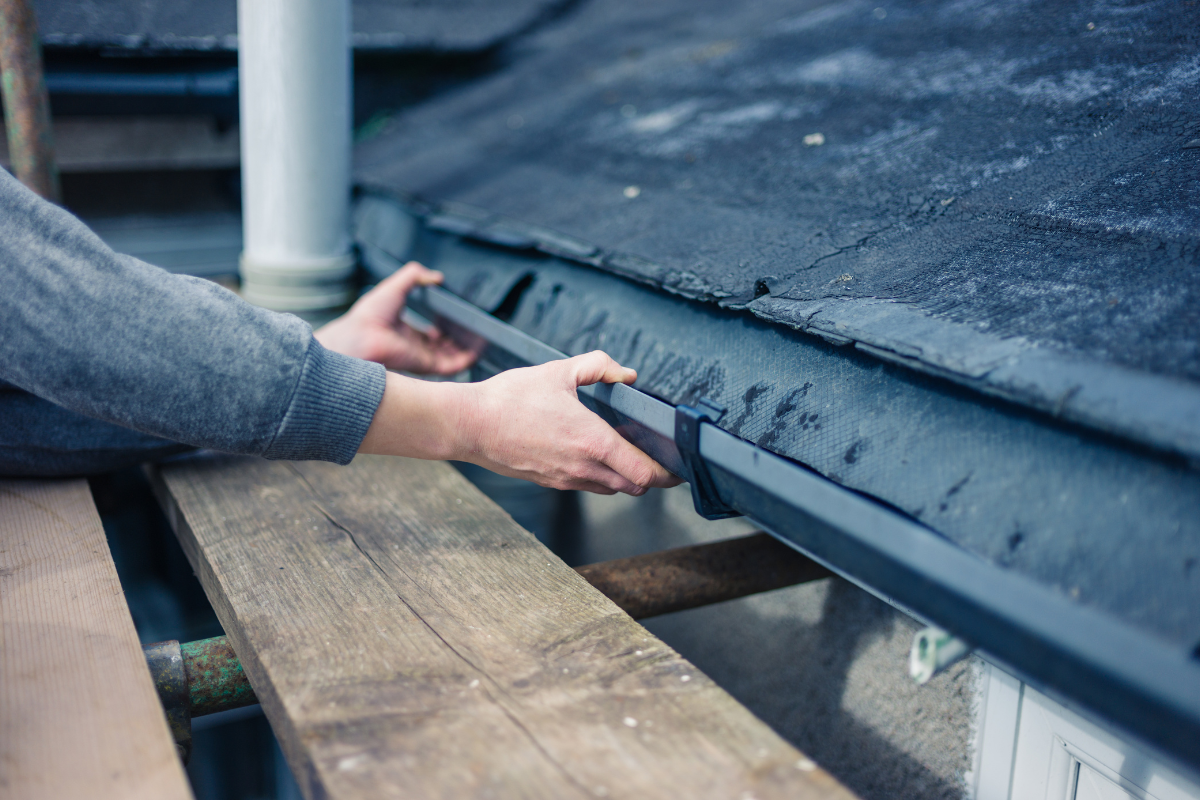
Ladders are simple tools that invite risk if you move too fast. A few rules I don’t break: work with a spotter if possible, set the ladder at a 4-to-1 angle, and tie it off when you can. I use ladder stand-offs that rest on the roof or wall rather than the gutter edge. Hanging your full weight on the gutter is a quick way to turn a cleaning into a bent-section gutter replacement.
Gloves matter, not just for mess. Wet debris can hide torn metal, popped nails, and even wasp nests. Eye protection keeps splash and grit out, especially if you plan to flush lines. For roofs with a pitch steeper than 6/12, I leave the roof walking to pros with harnesses. You can do most maintenance from a ladder, and you’ll see details up close.
The warm-weather cleanout that does real work
A proper spring cleanout is more than scooping leaves. You want to restore free flow from the highest point in the run to the ground. Start at the downspout outlet and ensure it is open. If the outlet is covered by a screen dome, remove it. Those domes clog first and often. Use a plastic gutter scoop or your gloved hand to draw debris toward you, then into a bucket. It’s slower than flinging debris to the ground, but it saves time in cleanup and avoids staining the siding.
Once clear to the eye, run water from a garden hose at the far end of the gutter. This tells the truth gutter cleaning about grade and hidden debris. Watch where the water hesitates. If it pools mid-run longer than a few seconds, that section likely lacks pitch. You may also find granular roof shingle grit, a sign of age or recent hail. Grit doesn’t just accumulate; it accelerates corrosion in steel and clogs underground drains if you have them.
If a downspout backs up while you flush, you likely have a clog at one of three places: the outlet drop, the first elbow, or the base elbow near ground level. I disassemble the lowest elbow first, since gravity tends to catch debris there. A garden hose with a jet nozzle or a plumber’s snake clears most plugs. If your downspouts feed into underground drains, be gentle; flexible landscape piping crushes easily and can hide roots. Persistent backups in underground lines are where gutter services with drain cameras earn their fee.
Fixing pitch, seams, and fasteners before storm season
After a good clean, imperfections stand out. Water flows or it doesn’t. Pitch concerns are common. Ideally, gutters drop about a quarter inch for every 10 feet toward the downspout. I’ve corrected hundreds of runs by moving or adding hangers rather than replacing sections. For hidden hangers, which look like clips under the front lip, tighten their screws into solid wood. If the screws spin in place, the fascia may be soft. Back out the screw and probe the hole. Spongy wood calls for a small section of fascia repair before you try to set structural screws again. Driving fasteners into rot is a waste; the weight will sag the run within weeks.
Seams deserve close attention, especially on older sectional aluminum or galvanized steel. Thermal expansion opens joints over years, creating hairline gaps that only leak during heavy flow. Clean the area with mineral spirits, dry it thoroughly, then apply a continuous bead of high-quality gutter sealant rated for wet applications. I prefer to seal from inside the trough and also on the exterior seam if it’s accessible. Give it 24 hours to cure if possible before a test flush. If you see repeat failures at the same joint every year, that’s a sign the section is flexing. A short splice with a new piece or re-hanging the run to relieve stress solves it better than smearing on more sealant.
End caps can loosen slightly from freeze-thaw cycles. A small tap with a rubber mallet and a bead of sealant around the interior edge usually does the trick. For persistent end-cap leaks on thin aluminum, a crimping tool gives a tighter mechanical lock before sealing.
The trouble with spikes and ferrules, and how to upgrade them
Many homes still have gutters held up by long spikes driven through ferrules. They look tidy from the ground but pull out over time. Every spring, I find spikes sitting proud by half an inch or more. The fix is to remove them and replace with hidden hangers that screw into the fascia. Use stainless or coated structural screws long enough to bite solid wood. Space hangers roughly every two feet, tighter near corners and outlets where weight concentrates. This upgrade alone often turns what looked like a tired system into a reliable one.
If your fascia board is bowed, you may need to shim behind the gutter to maintain a consistent front reveal and proper pitch. A slightly bowed fascia can create subtle low spots that hold water even when hangers are snug. Take the extra time to correct the backing rather than forcing the gutter to follow a bad line.
Downspouts that actually move water away
Water that exits at the base of the wall still needs a path. I’ve seen perfect gutters empty into mud six inches from foundation walls, which defeats the whole point. At minimum, use a splash block or an extension. I prefer hinged extensions that swing up for mowing and down during rain. They should discharge at least 4 to 6 feet away on flat ground, more if your soil drains poorly or the lot slopes toward the house.
Where patios or walkways trap discharge, consider a buried extension to daylight if grade allows. For tight urban lots, a dry well can work, but size it honestly. A ten-foot gutter run on a modest roof can send tens of gallons in a single downpour. A small gravel pit won’t keep up during a summer storm if soil is clay. If you have a short wall section that repeatedly gets soaked, splitting a long gutter run with an additional downspout at mid-span reduces peak flow and overflow.
Pay attention to the first elbow. Sharp 90-degree bends clog faster than two 45-degree bends. If you replace a crushed elbow, upgrade to a smoother path. It looks minor, but in practice it keeps you off the ladder later in the season.
Guard or no guard, and which type fits your reality
Gutter guards inspire strong opinions. I’ve installed them, removed them, and recommended against them depending on the property. The best match depends on your trees, roof pitch, and tolerance for maintenance. Micro-mesh guards excel at blocking small debris like needles and shingle grit, but they still need periodic brushing, and ice can warp them in colder climates if they are poorly supported. Perforated aluminum covers handle broad leaves well but can catch maple helicopters and oak tassels in spring. Foam inserts are easy to install yet tend to trap seeds and grow surprises by midsummer.
If you’re on a windy lot with tall oaks and a simple roofline, a well-supported micro-mesh guard can reduce cleanings from three times a year to once. On a complex roof with multiple valleys that dump water into short runs, guards can cause water to overshoot during downpours. In those cases, oversized gutters or a splash diverter might be smarter. The key is honest expectation. Guards reduce routine gutter maintenance; they do not eliminate it. If a salesperson promises zero upkeep, check the fine print and ask about spring fluff like catkins and seed pods. If you go with guards, insist on a system that is mechanically fastened and can be removed for service without deforming the run.
Materials, sizes, and when replacement is the better call
Aluminum is the most common material on residential homes, with 0.027 and 0.032-inch thicknesses typical. The thicker stock resists denting and holds pitch better over time. If your current gutters show a lot of pings and warps from ladders or hail, stepping up in thickness during gutter replacement pays off. Galvanized preventative gutter maintenance steel is stronger but requires vigilant coating maintenance to avoid rust where the zinc layer has worn. Copper looks beautiful and lasts decades, but it demands a budget and a careful installer. Vinyl belongs in the low-cost, DIY category; it can work on small sheds or porches, but it tends to sag and crack in cold climates and doesn’t handle ladder contact well.
Size matters more than most people think. The default 5-inch K-style gutter works for many roofs, but wide or steep roofs shed water quickly during cloudbursts. Upsizing to a 6-inch gutter with 3-by-4-inch downspouts increases capacity and reduces clogs. I’ve solved chronic overflow on eaves below a big valley simply by upsizing, without changing the roof or adding more outlets.
Replacement moves to the top of the list when the following converge: multiple sections are pitted or rusted through, fascia rot is widespread, seams fail again despite proper prep, or the layout is wrong for how the roof drains. You also consider the age of the roof. If you are planning a roof replacement within a year or two, coordinate gutter replacement after the new roof is on. Roofers sometimes scuff or deform gutters during tear-off. Installing new gutters on a new drip edge gives a clean interface and saves rework.
The quiet roof-to-gutter partnership
Your roof and gutters are partners. Drip edge flashing should guide water into the gutter, not behind it. I still see houses without drip edge, which invites capillary action and fascia rot. Check that the shingles extend properly into the gutter trough and that the underlayment laps onto the drip edge. If ice dams are a winter issue where you live, be cautious about heat cables. Cables laid directly on guards can warp them. When heat cables are necessary, put them on the roof surface and into the gutter trough in a way that doesn’t pinch or cut the guard or liner.
Pay attention to valley splash. Where two roofs meet and send concentrated flow toward a short gutter segment, a simple diverter or valley splash guard keeps water from shooting past during intense rain. I add these in stainless steel or aluminum, fastened into the roof deck beneath a shingle, sealed properly, and sized so they don’t trap debris. They are small, inexpensive pieces that prevent big headaches.
The spring checklist, condensed
- Clear all runs and downspouts, then flush with a hose to confirm free flow, proper pitch, and leak-free seams. Tighten or replace hangers, correct sagging sections, and re-seal end caps and joints that show any weeping. Extend downspouts to discharge at least 4 to 6 feet away, adjust elbows for smoother flow, and check underground lines if present. Inspect fascia and soffits behind the gutters for softness or staining, and repair wood before refastening hardware. Evaluate whether guards fit your tree load and roof layout, and whether upsizing to 6-inch gutters or larger downspouts would solve chronic overflow.
This short list covers most issues I see every spring. Each item prevents the next problem in the chain: standing water, leaks, rot, and foundation saturation.
When to call in gutter services and what to ask
There is no shame in hiring out part of this work. Multi-story homes, steep grades, and complex rooflines demand experience and the right equipment. Professional gutter services bring long ladders, stand-offs, harnesses, and a practiced eye. They can also fabricate seamless gutters on-site, which reduces the number of joints and potential leaks. If you are pricing gutter repair or gutter replacement, ask a few focused questions.
Ask about the thickness of aluminum they use and whether hangers are spaced every two feet or closer. Confirm that they install drip edge if missing and integrate with your roof underlayment properly. If guards are part of the proposal, request a demonstration of how sections are removed for cleaning. Clarify warranties: many offer separate warranties on workmanship and materials. Also ask how they manage drainage at grade. A reputable crew notices a downspout dumping into a low spot and suggests an extension or a dry well with measured capacity, not just a plastic splash block as a token.
A good estimator will look at your roof features, especially valleys and dormers, and suggest changes to downspout placement or sizing. If a bid simply swaps like for like without addressing chronic overflow points you’ve observed, keep looking.
Regional quirks and seasonal timing
Spring isn’t the same everywhere. In snow country, schedule the main clean once ice is gone and before the first warm heavy rains. Ice dam remnants can hide loosened hangers and peeled-back flashing. In coastal regions with live oaks, the big leaf drop often hits in late winter, then spring brings tassels that clog screens. Plan two light passes rather than one heavy one. In the Southeast, pollen strings can form a felt-like mat, and sudden thunderstorms stress downspouts. In the arid West, windblown dust and pine needles accumulate slowly, but wildfire risk raises the stakes for keeping troughs clear and dry.
Pay attention to the first three significant rains after your cleanout. Take a look outside during a downpour, especially at corners. You learn in five minutes what you might miss for months of dry weather. I often walk a property with the homeowner during rain, a short lap with a hooded jacket, and we mark issues in real time.
Small upgrades that make a big difference
A few low-cost changes raise the bar for performance and reduce future maintenance. Add splash guards at inside corners that overflow during heavy rain. Install strainers only inside downspout outlets, and clear them or remove them completely if they cause more trouble than they prevent. Consider painting the fascia with a high-quality exterior enamel after repairs; the sealed surface holds screws better and resists rot. Where gutters sit under long eaves, a continuous strip of gutter apron flashing prevents wicking behind the trough, which can blacken soffit vents and encourage pests.
If you have a rainwater harvesting barrel, install a first-flush diverter in spring. The first wash of the season often carries pollen, dust, and roof grit. Diverting that initial flow improves water quality in the barrel and keeps valves free of sediment. Check local regulations if you plan to expand; some municipalities have guidelines for stormwater handling.
Recognizing red flags that point to structural issues
Sometimes the gutter is the messenger. Persistent overflows at a single spot can signal a low roof edge due to sagging rafters. Recurrent leaks behind the gutter may point to missing or incorrect flashing, or a roof that was laid without a proper drip edge. Peeling paint on an interior wall near an exterior corner often traces back to an overflowing upper gutter. Efflorescence on basement walls tends to correlate with downspouts that dump too close to the foundation.
If you see green algae arcs on the siding below a corner, assume that corner overflows regularly. If your soffit vents show rust trails, water is getting behind the gutter. Those signs tell you where to focus your time first. In my experience, fixing the water handling upstream leads to multiple small issues resolving downstream without further work.
Budgeting time and dollars honestly
A single-story ranch with straightforward runs usually takes two to three hours for a thorough spring service if you are organized. Add time for downspout disassembly if you suspect underground clogs. Materials for basic gutter repair are inexpensive: a tube of high-grade sealant, a handful of hangers, stainless screws, and a couple of elbows or extensions might total less than a nice dinner out. Gutter replacement varies widely by region and material, but seamless aluminum in 6-inch size with properly spaced hangers is not a luxury item; it is a targeted investment where water is concerned.
If your budget is tight, prioritize function. Clear clogs, set pitch, and extend downspouts. Cosmetics can wait. If you can do only one upgrade this season on a chronic problem area, add a second downspout to a long run or upsize the existing downspout. Reducing the water volume per outlet changes performance dramatically during peak rainfall.
A short story from a June deluge
One spring, a homeowner called after a hard June storm overwhelmed her front porch gutter. Water had cascaded over the entry steps, soaked the door threshold, and warped the hardwood just inside. The gutter looked clean at a glance. On the ladder, I found a subtle belly over the porch span. The hangers, spaced about three feet apart, had loosened slightly, and the run pitched toward the middle instead of the downspout at the far corner. There was also an inside corner above that fed a fast stream into a short section.
We replaced the old spikes with hidden hangers every 24 inches, corrected the pitch by nearly three-quarters of an inch across 28 feet, added a small splash guard at the inside corner, and upsized the downspout to a 3-by-4. Cost was modest. The next storm came two days later. She texted a photo of dry steps and a neat sheet of water exiting the extension five feet out. The hardwood dried flat. The fix wasn’t exotic; it was careful basics done in the right order.
Keep the habit as the weather warms
Spring gutter maintenance isn’t just a once-and-done chore. It’s a habit that pays off quietly all year. A quick mid-summer check after a big storm and a light pass early fall often keep you off the ladder in November when the air is cold and the stakes feel higher. If you keep a simple log, even a note on your phone with dates and small observations, patterns appear. You’ll know which corners misbehave, which trees shed when, and whether last year’s seal on the southeast seam is still holding.
When water leaves the roof and travels the path you intend, homes last longer and cost less to own. Whether you handle it yourself or rely on professional gutter services, a focused spring checklist reduces surprises. If the work reveals that your system has aged out, plan for gutter replacement with the right materials and sizing for your roof. If it only needs targeted gutter repair, the best time to make those fixes is before summer storms arrive. Either way, you are buying peace of mind, and that is worth far more than the hardware you can see from the street.
Power Roofing Repair
Address: 201-14 Hillside Ave., Hollis, NY 11423
Phone: (516) 600-0701
Website: https://powerroofingnyc.com/